Improper use of high-pressure cleaners is fraught with electrical failure and damage to the paintwork.
With the spread of self-service car washes, some motorists “moved” there. Only now the wrong car wash can end badly for the car.
First of all, you need to know how to use a spray gun, the pressure in which is maintained at 170 bar.
It is necessary to start washing from a distance of about one meter, gradually changing the angle from 45 to 25 degrees and bringing the sprayer closer to the surface by 50 cm.
If you neglect these rules, then, for example, pieces of paint can chip off from the paintwork of a car. Rubber bands for door and glass seals can break, and chrome plating on plastic parts will come off.
But the worst thing is when water gets into the engine compartment. If the jet hits the engine control unit, then subsequent short circuits can damage the microcircuits.
One of the alternatives to wash the body or exterior of the car is through a dry process, that is, without using water and only using certain products that are for sale in stores or online.
Although the practice of dry cleaning the car saves water, it is important to do it perfectly, since not doing it can damage the paint.
What is a dry car wash?
It is important that specific products are used to dry-clean cars and not only clean the exterior with a dry cloth, as this is extremely harmful to the bodywork, scratching it with dust particles.
All waterless car wash products use a formula that consists of polymers that act on dirt and dust, encapsulating them and then dissolving them, allowing them to clean and achieve a scratch-free finish.
How do you dry wash a car?
In the waterless car wash, in addition to the special product, a microfiber cloth is necessary to spread the formula on the surface to be cleaned. After applying the product, it will leave the most solid dirt in suspension, which can be quickly and easily removed with a cloth.
To achieve a perfect result, the ideal is to make a second pass, always with a clean microfiber cloth. Do not forget to clean the cloth to remove dirt residues and pass it over the bodywork in the same direction.
Advantages and disadvantages of dry cleaning
Due to the fact that it is necessary to pass the cloth by zones and for a better finish in two times, the dry cleaning of the cars takes more time than a traditional wash, however, it is possible to do the cleaning in places where restrictions of Water.
To the above, we must add that it allows you to thoroughly clean the car at any time, in any place and without spending liters of water. The latter is extremely transcendental from an ecological point of view, since normally 20 to 140 liters of water are needed to wash a car.
One of the disadvantages of dry cleaning is that the products have a somewhat high price, especially when compared to a traditional shampoo that does require water.
It should be emphasized that dry cleaning cannot scratch the paint, of course as long as the product is used. In addition to not damaging the bodywork, it helps to leave a shiny appearance as if it had been waxed.
Ideal for maintaining the facade of your house, the walls, the terrace, the car, the walls of the swimming pool… The high pressure cleaner allows you to clean your entire exterior. Here are our tips for choosing the right one.
Not all pressure washer models on the market can clean all outdoor spaces. It all depends on its features, its equipment or its price. Follow the leader!
Pressure washer pressure
Pressure measures the force at which water is forced out of the cleaner and therefore its ability to loosen grime from a surface. The most affordable and simple models are satisfied with a few tens of bars, while the advanced pressure washers are capable of reaching more than 300 bars. Entry-level models will therefore be able to take off the mud of an ATV with their pressure of 110 bars. On the other hand, to restore its youth to a terrace, it will be better to opt for models that display a pressure greater than 120 bars.
Pressure washer flow rate
Pressure is not the only criterion to take into account when buying. It is the combination of speed, power and different features that is important and that will affect its performance. Expressed in liters per hour (l/h), the flow rate of modest pressure washers varies between 200 and 300 l/h. It can go up to more than 600 l/h for more expensive models. Note that a high flow rate often guarantees less working time for a given surface.
The frequency of use of the pressure washer
For rather occasional use, prefer a pressure of 100 to 120 bars, so you can wash your car, your terrace or your garden furniture for example. This type of machine is particularly suitable for wooden surfaces that do not support too much pressure and could risk defibration. For the occasional washing of floors and terrace tiles, gutters or exterior facades, a pressure of 120 to 140 bars is preferred. On the other hand, for much more frequent use, a pressure of more than 140 bars is necessary. You will be able to clean walls, metal grilles, motors or any other surface.
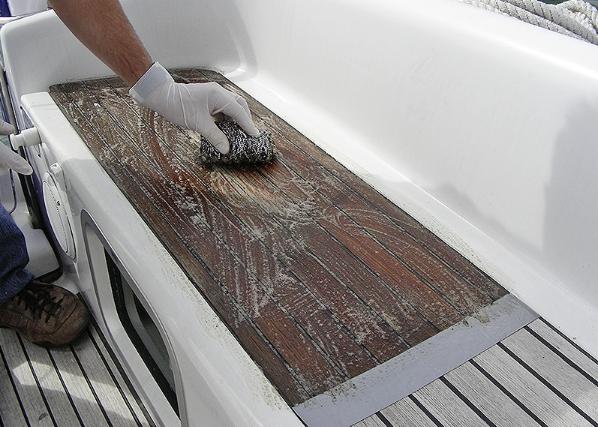
Maintaining a boat is not just about scrubbing the deck with a brush and a little water. It must be admitted that, after going out to sea, a certain amount of courage is necessary to arm yourself with a hose and a brush. However, by applying the right gestures, it is possible to save time and efficiency.
Exterior cleaning of the boat
The rule is simple: start with the most aggressive products and end with the least aggressive. In concrete terms, we first use a yellow remover, then we end up with a deck shampoo.
For example, it is necessary to deal first with the wooden fiddles which will, during cleaning, evacuate their black marks on the deck after having been brushed and rinsed, then finish with the stanchions or the stainless steel pulpits.
These can even be treated after washing the deck, to avoid any splashes of water that would leave marks and reduce the effort of proper polishing to nothing. This is why, for this specific position, it is preferable to use cleaning products formulated with a paste or gel.
Finally, it is necessary to clean from bow to stern, paying particular attention to the deck hatches and other overhead portholes, especially if they are Plexiglas, to avoid leaving traces of water which, as they dry, would leave streaks visible in the sun. On the weather side, it is possible to work in all weathers, except for a few specific positions, such as the treatment of teak which must be done dry.
Interior cleaning of the boat
As with exterior cleaning, interior fittings must be completed by the place where you leave. These are often the downhill steps. We therefore logically start from the forward cabin and end with the saloon.
The partitions and the upper parts must be treated as a priority, then it will be the turn of the bottoms, which must not be forgotten, to finish with the floor where the traditional mop will be finished. Compliance with such an order will necessarily benefit the owner.
And even if an individual does not have the same requirements as a cleaning professional, he can take advantage of the time saved to sail, enjoy his boat, etc.
Which is nothing out of the ordinary. Good practice means doing things in the right order. They also save time.
Among the tips of the professional, we can mention products with a dense foam, which anchors well on the support, without flowing, and works almost alone. Hence compliance with the dosages recommended by the manufacturer, knowing that eco-designed products make it possible to be more tolerant with respect to this dosage.
Finally, it may happen that traces do not leave (like mold on mattress covers). These can be erased with chlorine, for example. But you have to be careful not to alter the support and know how to stop before.
Equipment
Professionals use deck brushes of different hardnesses (hard, medium and soft), but also joint brushes (also of different hardnesses), whose smaller head will remove dirt in the corners.
Added to this are sponges, and those also called “magic sponges” for upholstery, fabrics or linings, which are more fragile and require precautions. Finally, the essential chamois leather will wipe away the traces of rinsing.
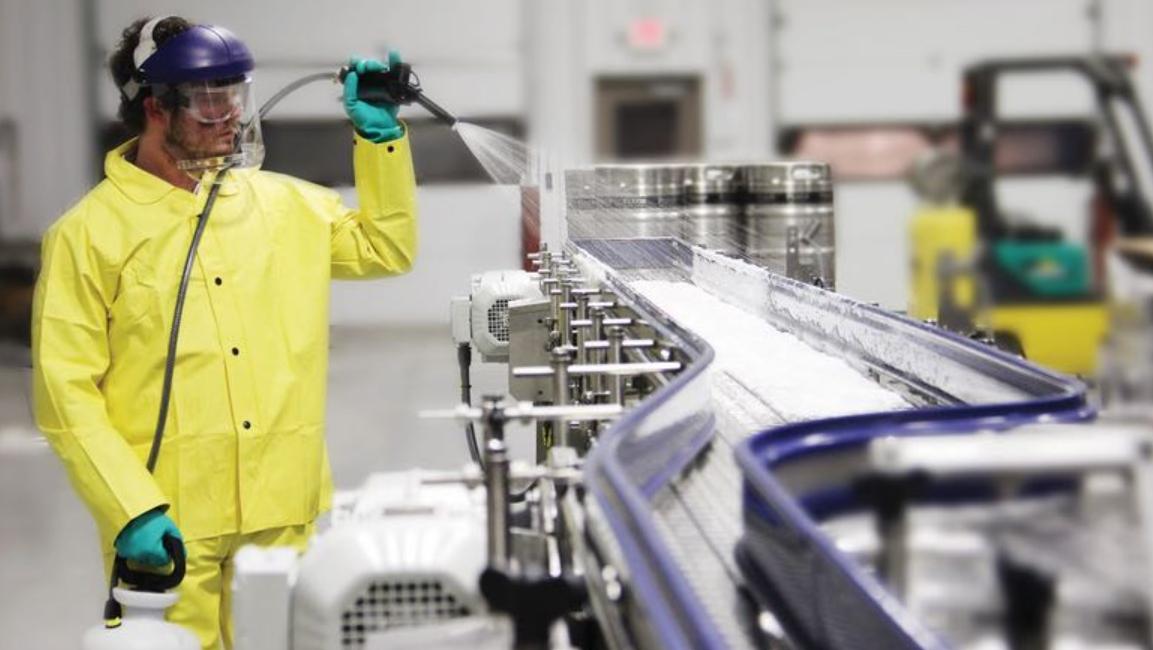
When hot water at temperatures of 85-100°C is introduced for cleaning with a high-pressure cleaner, there is a drastic reduction in bacterial colonies. Employing best practices aggressively when cleaning can improve hygiene by disinfecting high-touch surfaces and common spaces.
Nilsifk (the one of the world’s leading manufacturers of professional cleaning equipment) gives eight pro tips on how to best reduce or eliminate germs step by step for optimal cleaning results:
Know the application. Before you begin, assess the environment, as well as any dirt and bacteria potentially present. Ask questions such as: “Does the environment allow the use of hot water pressure washers, considering the large amounts of water and exhaust gases?” Also, for the full cleaning protocol, ask, “What disinfectants will I need at the end of the cleaning process?”
Evaluate the best cleaning parameters. Depending on the types of dirt and surface, evaluate the optimal levels of water flow and pressure: high flow and medium pressure for the most superficial dirt, and higher pressure levels for the most difficult, stubborn and encrusted dirt.
Choose the appropriate temperature levels. In the case of the reduction of bacteria and germs, the highest temperatures are those that serve to break them down. In general, temperatures of 85-100°C will quickly allow a drastic reduction in bacterial colonies, although only temperatures close to 155°C will kill many germs completely. Therefore, you will need to turn the cleaning temperatures up to maximum levels to begin the disinfection process. For example, Covid-19 is eliminated at a rate of 10,000 units per 30 minutes at a temperature of 56°C. With this cleaning duration and required temperature, a hot water unit alone will not be efficient. Add a detergent.
Choose the right detergent for the job, and prepare the surface. Be sure to select a complementary detergent to help fight germs. Local and regional health organizations often recommend the right ingredients for each task. Soak surfaces with detergent to break down tough layers of residue and dirt.
Rinse surfaces with hot water or steam. Rinse off detergent and power wash surfaces to completely remove all layers of dirt and debris. Hot water increases cleaning efficiency and increases the disinfecting effect. Some units can heat water to 140°C to vaporize it, allowing for wet steam pressure cleaning. This process can partially sterilize surfaces.
Apply disinfectants. Hot water is not sufficient for disinfection, although it can generally reduce bacteria counts with sufficient exposure time and temperature. It is necessary to finalize the cleaning protocol with a disinfectant. Choose the disinfectant according to local legislation, and according to the type of bacteria that must be eliminated.
Get the right end tools. The right accessories ensure optimal, effective and efficient cleaning the first time. Consider purchasing lances, nozzles and sprinklers.
Let dry. Allow surfaces to dry before allowing animals or people to pass through again for hygiene or safety reasons.
Germs feel particularly comfortable in the trunk – regular cleaning is advisable
Everyone knows that a car is not germ-free. However, the fact that there are more strains of bacteria in the interior of the vehicle than in ordinary toilets may come as a surprise. A study by the British Aston University found that to be the case. High time to change the car care.
The highest level of germs is in the trunk
Bacteria alarm on driver’s seat and shifter
Clean the inside of cars regularly
The British Aston University (Birmingham) examined five different vehicles between the ages of two and 17 years. Children and animals were traveling in three cars, and only the pet in one. All five cars were bought used. They compared the samples that the researchers took from the cars with the samples from two toilets.
Trunk: More bacteria than in a toilet
The researchers were able to identify 1,425 strains of bacteria in the rear compartments alone. According to the study, most bacteria can be found in the trunk. Bacterial contamination – including faecal germs – was even higher than that of an average toilet. Coli bacteria could also be detected in many cases. They can trigger gastrointestinal diseases.
Tip: Wash fruit, vegetables etc. thoroughly in the future. Just wipe other things that you clear out of the trunk.
Driver’s seat and shift lever heavily soiled
According to the study, 649 types of bacteria were found in the driver’s seat – including faecal germs. The disgust ranking is followed by the shift lever (407 strains of bacteria), the rear seat (323 strains of bacteria) and the dashboard (317 strains of bacteria).
Tip: Wipe the steering wheel and shift lever often with an antibacterial damp cloth.
Steering wheel: Fewer germs – probably thanks to Corona
Surprising: Only 146 different types of germs were detected on the steering wheel. What sounds reassuring at first is deceptive. The researchers believe that the picture is clouded by the corona hygiene measures because people are currently frequently disinfecting their hands. The scientists assume that the steering wheel is normally subjected to the most stress – similar to the button on a toilet flush.
The germs come over the years
The study was able to clearly demonstrate that the bacterial load increases the older a vehicle is. Bacterial strains therefore continue to accumulate with age.
Tip: If you buy a used car, you should take enough time for a thorough cleaning and especially clean the trunk. Carpet and plastic cleaners are suitable for this.
Proper car care: It is essential to clean the inside as well
So if you want to take good care of your car, you should not only drive your car to the car wash from time to time, but also clean it regularly from the inside.
The car roof is adorned with paw prints of martens and the neighbour’s cat. And the pollen has left streaks on the windows: high time for a car wash. Experts provide tips for proper care and explain why shine sprays are dangerous and what helps against animal hair on car seats.
There is no federal regulation for car washing in front of the front door. In some communities, hand washing on unpaved ground is prohibited because the washing process could release chemicals, fuel and lubricant residues into the groundwater. But there can also be problems with a car wash on solid ground: Permission must first be obtained from the responsible authorities. If you want to save yourself the bureaucracy, you should either head for so-called self-service wash boxes, where you still have to wash the car yourself. Or the driver drives to a car wash or car wash. According to the ADAC, the cleaning effect is the same for both.
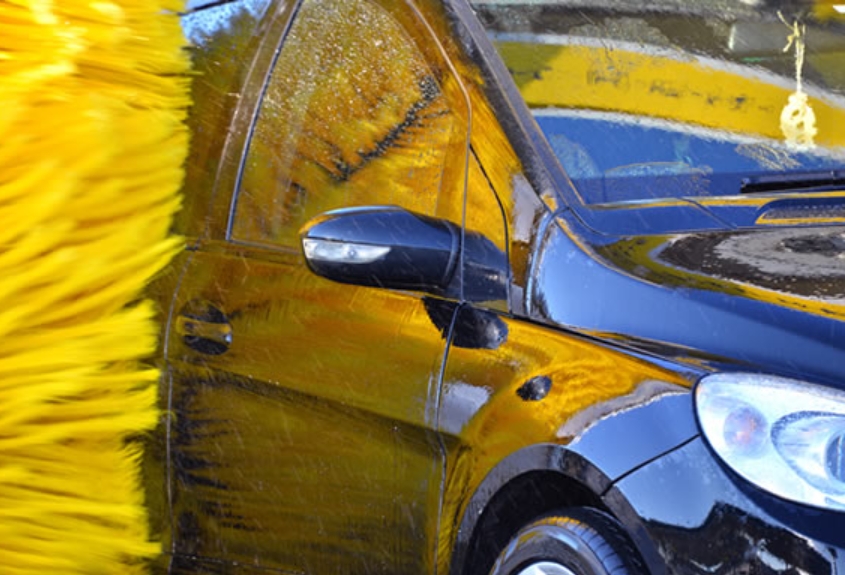
Check washing quality
As practical as a car wash or car wash is, drivers should pay attention to the cleanliness of the brushes. The best way to do this is to take a closer look at the ends of the nylon threads: If they are frayed or brittle, dirt can get caught in them more easily. Then such brushes act like emery paper and cause small scratches in the paintwork during washing. However, this risk also exists with car washes or car washes that clean cars with cloths instead of brushes. Also, neither the price nor the washing time are quality features for car wash systems or lines. It is therefore worth taking a look at cars that are already running before you wash them to see how good the quality is.
Prevent damage
If drivers break something in the car wash, they have to take responsibility for it. It happens again and again that customers step on the brakes during the washing process or drive the car wrong into the facility. Some also fail to remove the antenna, which can break off and cause damage. However, the liability rules are less strict than in road traffic. The following applies here: It only costs money if the owner of the system can prove that the customer is at fault (Cologne District Court, Az. 272 C 33/12).
Conversely, damage can also occur during washing. It is therefore important to take a close look at the vehicle afterwards – whether the paintwork has not been damaged. In this case, you should report the damage to the operator of the facility before leaving the property, advises the ADAC. However, the customer must prove that the damage occurred in the car wash. If it is clear that the damage was caused in the car wash, the car wash operator is generally liable for damages. However, he can exonerate himself if he can prove that the customer has not used the system correctly. Plant operators often try to avoid liability by referring to the general terms and conditions. However, not every clause is admissible.
Select washing program
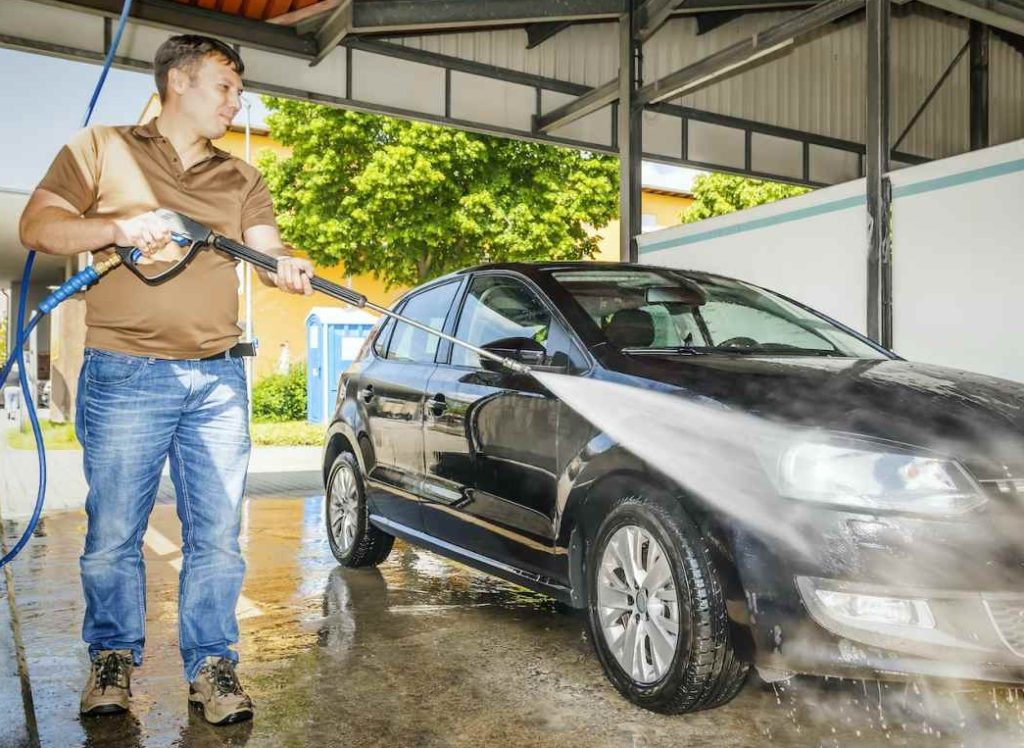
For heavily soiled vehicles, an individual pre-wash is advisable. Dirt that has dried on must be soaked before the actual wash cycle. there is a risk that the rollers will scratch the paintwork. Systems with manual pre- and post-treatment, for example with a steam jet, deliver particularly good results. However, caution is advised when pre-washing near the tires, experts from Dekra warn. Because tests have shown that a sharp jet of water at close range could endanger the rubber of the tires. Dekra experts recommend keeping a distance of at least 20 cm with the high-pressure cleaner and using a wider water jet by angling it.
It doesn’t have to be the most expensive program either. According to ADAC, if you want to save costs, you should choose a simple foam wash. If it is heavily soiled, it makes sense to wash it twice. Most car washes offer preservation with hot wax, which is sprayed onto the vehicle before it dries. According to ADAC, however, such wax treatments do not last long. It is better and also more economical to polish the paintwork yourself with hard wax after washing. Washing the underbody is mainly important in the winter months: According to the Fraunhofer Institute for Paint Technology in Bremen, road salt can clog the underbody and engine parts. If the salt accumulates in a sheet metal seam, it can lead to corrosion in combination with moisture.
Treat immediately
The brushes and cloths of a car wash only get into all the cracks and joints to a limited extent. Therefore, vehicle owners should clean the entrances, hinges of the trunk lid and the mirrors by hand after machine cleaning. To do this, put some car shampoo in a bucket of water and clean with the sponge. Then wipe with the kitchen sponge cloth. Then clean the wiper blades with a damp cloth and dry well, recommend the experts at the German Motor Vehicle Trade Association (ZDK). It is also important to open all doors, the bonnet and the trunk and to dry the car with a cloth.
Clean interior
Pet hair on car seats is stubborn. According to Tüv Süd, they can only be removed from the upholstery with a lint brush or a powerful vacuum cleaner. The suction power of vacuum cleaners in car washes is usually stronger than those in your own household. Chewing gum residues are also annoying: These can be easily removed if they are sprayed with cold spray from the pharmacy beforehand. The panes can be cleaned inside and out with conventional glass cleaner. Dirty plastic parts are best wiped off with a damp microfiber cloth. According to TÜV Süd, household cleaning agents and dishwashing detergents are taboo. You should generally avoid using shine sprays. They make plastic surfaces shine like new, but make them slippery. This can have fatal consequences on the steering wheel or on the pedals. Be careful with detergents that contain plasticizers. They can attack the predetermined breaking points of airbags and make them porous. Special care products for upholstery, leather and plastic are available from specialist retailers.
Save engine wash
According to TÜV Süd, washing the engine with your own high-pressure cleaner is not a good idea. The electronics in the vehicle in particular can easily be damaged in this way. In addition, washing the engine on the street or on one’s own property is prohibited, as this can allow oil to get into the groundwater and sewage system. This also applies to washing the outside of the car. If you like to wash your car yourself, you should go to a car wash. There, the dirt is separated before the water enters the sewage system.
Remove animal tracks
If there is bird droppings on the paint, it should be removed as soon as possible – preferably with water. If that is not enough, the ADAC recommends soaking the dirt in warm water and a little washing-up liquid before wiping it off. By the way, this also helps against dead mosquitoes on the windshield. Only with honeydew, the secretion of aphids, is it not enough to wipe away. Here, the ADAC recommends soaking the dirt for a little longer – and first putting a damp cloth or a damp kitchen towel on the dirty areas. If you want to wipe away cat or marten tracks, you should use a fine cloth. Because if you rub too hard, you risk rubbing fine stones into the paint – and that causes scratches.
Every owner of a vehicle at least once in his life asked himself the question: “How to clean the car engine from oil, dirt and other deposits? Indeed, over time, a lot of these “by-products” are deposited on the surface of the engine body. In addition to the fact that this phenomenon is unpleasant from an aesthetic point of view – heavy contamination can disrupt the temperature operation of the engine.
Why do I have to wash the main parts of the car?
It is customary for every vehicle, just as it is for humans, to follow certain rules of “hygiene”. This is to ensure that the body of the vehicle is not subject to corrosion and is resistant to external influences. In addition, the power plant and gearbox dissipate heat not only through the coolant. The outer metal surfaces of their housings play an important role in this process. If they get covered with a layer of dirt and oil, thermal regulation can be impaired.
In addition to the power unit, the radiator, through which the coolant gives off its heat to the surrounding atmosphere, can be contaminated. Insects and dirt stuck on the cells complicate the heat transfer process.
It should not be forgotten that engine parts undergo wear and tear during operation. This means that metal particles get into the engine oil. Unfortunately, not all of them are removed by the oil filter. Some of the debris settles in the engine crankcase. The oil composition, circulating through the system, picks them up again and spreads them all over the engine’s lubrication system. Getting on the contact surfaces, the metal “dust” gradually destroys them. The consequences are obvious – it reduces the engine’s resource, disrupts its normal operation, and causes loss of power. That is why when changing oil at home motorists try to drain it out of the system completely. Some craftsmen manage to remove the most contaminated oil residues from the crankcase with a syringe and a tube afterwards.
Contamination of the under-hood and the engine may adversely affect the operation of the electronics and the ignition system. In addition, if the oil seal is leaking somewhere in the engine, this malfunction is difficult to detect because of the thick layer of dirt and oil deposits. You should also be aware that when the power unit is dirty, the risk of fire increases. Oil deposits can catch fire if the exhaust fumes break through. An accidental spark can also cause such fatal consequences. All of the above arguments lead to the obvious conclusion: periodically cleaning and flushing the main components of the car is as important as for its owner to take regular showers.
Another reason to wash the engine and the whole underhood space is selling the car. In this case, pre-sale preparation is an essential attribute that allows the buyer to assess all the advantages of the proposed vehicle.
Washing up products
Every car, like a woman, needs proper care. Most motorists know how to tidy up the interior of a car. However, not everyone knows how to clean the engine from oil and dirt deposits. To do this, it is not enough to take a container with warm water, a rag, a brush. In addition, you need at least special detergents. In the case of stale and thick deposits, such a set of tools is not enough.
To solve this problem, they often resort to the use of installations that deliver cleaning compounds under strong pressure, which in itself is not safe. The thing is that the strong jet may mechanically damage electrical wiring, gaskets and other elements. As a result – engine failure.
To clean the engine case from heavy dirt, many experienced drivers use diesel fuel or kerosene. It is better to wash with kerosene – there is less chance of fire. Keep in mind: if you use diesel or kerosene for washing, acrid smoke will be released from the surface of the engine body. This will happen after the engine has warmed up. Gasoline as a cleaning agent is unacceptable because of the high probability of ignition. In addition, gasoline fumes are explosive.
Some drivers try to adapt various household detergents for this purpose, and they sometimes succeed quite well. But, again, there can be unintended consequences. For example, when using compositions containing chemically active elements – alkalis or acids – parts made of plastic and rubber may get damaged. There is a possibility of oxidation of metal parts.
Today there are a sufficient number of products that allow you to properly rinse off the surface of the engine dirt and oil film, so it is best to use them. There are foreign and domestic compositions on the market – in the form of gel, foam, liquid or aerosol. Each of them has its own rules of application, described by the manufacturer.
How to wash the engine and underhood properly
Before you start cleaning the engine and surrounding components – from dust, oil and dirt, you need to follow a few simple rules, and the very cleaning and washing should be performed in a certain sequence.
To begin with it is necessary to prepare a few improvised means: rubber gloves, polyethylene and foil, tape or duct tape, a rag, a brush (only not made of metal), a sponge. A detergent also needs to be purchased.
It is better to clean the engine in warm, dry weather, so the excess moisture will evaporate faster after washing from under the hood.
Before you wash the power unit, you need to let it cool down to an acceptable temperature – from 50 to 60 ° C. If the engine was cold – then you need to warm it up to the same temperature.
It is necessary to remove the terminals from the battery, after that it is advisable to remove it from under the hood.
Parts such as the tumbler, ignition coil, air filter, terminals and other components of electrical connections, depending on the model and design of the engine, must be protected from moisture. This is done with polyethylene, foil, tape or duct tape.
It is required to moisten all dirty surfaces with a small amount of water. After that, a cleaning compound is applied. If it is an aerosol – it is simply sprayed on all surfaces that need cleaning. If it is a prepared solution – you can spray it with a spray gun or apply it with a sponge. In hard-to-reach places, it is better to use a small brush, such as a toothbrush.
After that, you need to wait a while until the cleaner comes into contact with the dirt. The time interval is usually specified in the instructions for use of the detergent.
Finally, it is required to wash the entire underhood space, where the cleaning composition was applied. This should be done with extreme care, avoiding water to the places of electrical connections and others described above, even if they are protected with polyethylene or foil. A hose with a good stream of water is often used for this procedure. The end of the hose can be pinched with your fingers to create more pressure.
After rinsing, the quality of the cleaning is checked. If some dirt is left somewhere, the procedure can be repeated again.
Well, your favorite “iron horse” became clean and tidy. True, it is impossible to start the engine and drive the car. The under-hood space needs drying. To do this, you need to lift the hood and dry the surfaces of parts under it with paper towels. You need to be especially careful to remove moisture in the area of elements protected with polyethylene or foil. Only after that you can remove the protective equipment.
After the initial drying, the moisture will evaporate for at least another 12 hours. Therefore, if possible, it is better to leave the car in the garage with the hood up until it dries. If water gets on the contacts or terminals, as a result of which they are oxidized, you can clean them with an aqueous solution of baking soda in the proportion of 1:1.
Flushing the lubrication system
It’s not just the engine housing and surrounding parts that need cleaning. Systems such as the cooling and lubrication systems also require periodic cleaning. This procedure must be carried out when the car owner has decided to use a new engine oil from a different manufacturer. Or the manufacturer is the same, but the viscosity and quality parameters are already different. In addition, over time in the oil system there are still products of oxidation, wear of parts, fouling. There are two ways to flush the oil system.
The car is installed on a pit or a trestle. After that the old engine oil is drained through the drain plug. The so called flushing compound is poured into the throat. With it the engine should run for some time, specified in the instructions of the manufacturer of flushing oil. After that the flushing oil is also removed from the system.
The old grease is not removed. It is filled with special detergent additives to clean the power plant. After that, the engine runs, as a rule, for a few minutes. More precise time is specified in the additive instructions. After stopping, the old oil is removed from the engine.
It is worth noting that the method of cleaning with flushing oil is softer and gentler for the power unit. The second one is tougher because of the strong aggressiveness of most additives. In any case, after flushing, you should immediately pour a new lubricant and replace the oil filter.
It is not recommended to get addicted to flushing the lubrication system without an absolute necessity. It is better to use the same brand of oil fluid, and replace it more often – not after 15 thousand kilometers, as the regulations say, but after 7-8 thousand.
Cleaning the cooling system
Over the course of operation, scale and salt deposits appear in the channels of the cooling system. This process is inevitable, as the antifreeze is constantly under stress due to sudden changes in temperature. Therefore, a periodic flushing of the cooling system is a necessary procedure. You can perform this work as follows:
the used antifreeze is drained from the system;
a mixture of distilled water and a small amount of vinegar is prepared in the required quantity;
After that the engine runs for a certain time and then the flushing solution is drained out;
new antifreeze is poured in its place.
For better cleaning of cooling ducts, it is better to use special agents. There are a sufficient number of them on sale – both domestic and foreign-made. Each comes with instructions for use.
Accidents happen. Whether it’s oil left over from a guest’s leaking car, grease from a broken truck, or vegetable oil from the last backyard barbecue, it’s likely that someday you will run into an unwanted stain on the paving stones in your courtyard or driveway.
In most cases, you will be able to remove the stain with products that you have in your home or that can be easily purchased from your nearest home renovation center. When that is not the case, you can always professionally clean the driveway, or you can simply replace the stained paving stones and return the driveway or patio to a new look almost immediately.
Here’s a step-by-step guide to help you remove grease and oil stains from paving stones:
Step 1: If the stain is fresh and there is still liquid on the surface, dampen as much oil or grease as possible with a rag or paper towels.
Step 2: If there is still a significant amount of oil or grease on your paving stones, apply regular cat litter to the stain and gently push it into the stain. Do not use a wire brush for this, as it may scratch the paving stones. Allow the litter to absorb the liquid, then remove the litter by sweeping and discarding.
Step 3: Scrub the area using dish soap, water, and a dishwashing brush or deck brush (avoid wire bristles). It is always best to use natural products whenever possible, but you may find that dish soap known for its cutting oil and grease like Dawn will give a more satisfying result. Alternatively, you can also use baking soda instead of dish soap, especially for small stains.
Step 4: Spray the area with a garden hose with a nozzle. This will allow you to use a higher pressure direct spray to clean the area. A pressure washer can be used, which can help to better remove grease or oil stain, but surfaces such as concrete, bricks or paving stones can be easily damaged when using a pressure washer.
Hopefully these four steps will help you remove grease or oil stains from your paving stones. However, if these methods are not enough to remove stains, there are other options. For example, you can try using an oven cleaner by spraying it liberally over the stain, letting it sit for 15-20 minutes, and then rinsing it. However, keep in mind that oven cleaner contains chemicals that are not breathable and not suitable for flushing storm drains, lawns or flower beds.
For particularly stubborn stains, you may need to go to a hardware store and purchase a degreaser specially formulated to remove stains from the driveway. If you need to go this route, follow the directions on the product for the best results.
Alternatively, you can professionally clean your driveway. Just be sure to use a contractor who is familiar with paving stone cleaning and knows that extreme care must be taken when using a pressure washer and wire brushes must not be used.
If all else fails, you can always replace the soiled paving stones. This is one of the advantages of choosing ‘paving stones instead of stamped concrete or slab concrete. If concrete driveways or terraces are damaged or have stains that cannot be removed, you will have to cut and replace the entire section or slab. And even after this costly renovation, the new section will be clearly visible, since it is almost impossible to get new concrete that matches the old concrete. However, with a paved path or patio, you can easily replace one or more paving stones without anyone even noticing. Or contact our company and our specialists will remove all the dirt from the patio at a low price
I was faced with the need to clean the roof. I have shingles, installed relatively recently, but in some places, for some reason, moss and lichen have already appeared. This is very unpleasant, because the house looks kind of abandoned. Can a soft roof be washed with a pressure washer like a compact car wash? I was told that the pressure washer will damage the soft roof. Are there any other options for cleaning the roof? And after the roof is cleaned, is there any way to prevent the appearance of moss and other unnecessary things?
John Lansky asks us, Louisiana
I would argue that the north, northwest and possibly west sides of your roof look bad, while the rest of the parts look like new. Moreover, I will assume that the worst parts of the roof look, on which the most shadow from the trees falls. I know this because I myself have exactly the same problem as you. Some parts of my rooftop look like the Amazon rainforest. The wind carries moss and lichen spores to the roof, they can also fall from trees or birds can bring them. With abundant rainwater, these spores begin to grow. Since the northern, north-western and western parts of your roof remain in the shade in the morning, the dew that appears on the roof at night does not have time to quickly evaporate. This morning moisture just quenches the thirst of the microscopic botanical garden on the surface of your soft roof. Other parts of the roof dry out quickly and the moss and lichen die of thirst.
I have also heard many times that a pressure washer can damage a soft roof. I know for sure that such sinks can partially destroy concrete. It is a fact. Therefore, it seems logical that the pressure washer can seriously damage the soft roof on the roof. But since I know how easily and quickly it is possible to replace one or several tiles of a soft roof, I decided on an experiment. Moreover, my soft roof is already twenty years old and it is living out its own. I also decided to test a few new soft roof tiles to see if the pressure washer will wash the colored granules off the surface of the material.
The experiment began with the fact that I took a powerful pressure washer with a gasoline engine. This sink is capable of delivering water at a pressure of 150 kg per square centimeter, using 9.6 liters of water per minute. For the spray nozzle, I used a 25-degree nozzle, which is used for general purpose cleaning.
The results of this experiment were amazing. With this pressure washer, I was able to wash all the moss, lichen and twenty years of dirt off my roof. The bituminous shingles did not receive any damage.
At first, I held the spray gun at a distance of 30 centimeters from the surface of the soft tiles, aiming it at the bottom of the roof. There was no tangible result. But as soon as I slowly brought the sprayer to the roof surface at a distance of 15 centimeters, the dirt and vegetation began to wash away. I recommend gently cleaning one tile at a time and then stopping and checking the tile for damage. Move to another part of the roof where the soft roof looks good to make sure that the freshly washed soft roof looks the same. Rest assured that during the cleaning process you can easily spot any damage. If you see small or large black spots or pieces of fiberglass, stop. You are destroying the roof.
You can also use a regular garden hose and brush to clean the soft roof. True, this will already be a titanic work. Always point the hose or pressure washer spray at the bottom of the roof. Never direct the water flow upwards, as it can penetrate under the soft roof and multiple leaks into the house are likely.
If you install copper strips on the top of the roof, then after you clean the soft roof, it will look like new for a long time. To do this, you need to install copper strips 5 – 7 centimeters wide along the ridge. Now you can buy a soft roof, which has already been coated with an invisible copper layer. Then you don’t have to do any of the above to get rid of the moss and lichen. The slow release of copper on the roof surface prevents the growth of moss, lichen and any other plant microorganisms.
Be extremely careful on the roof when dealing with water. If you wet the roof on which there is moss, lichen, dirt, then it becomes slippery, as if oil was spilled on it. Always try to work on the dry part of the roof. Move from the ridge to the eaves within one vertical line, about 50 centimeters wide. Do not forget that somewhere nearby there will always be a hose on which you can also slip. Use a belay to keep from falling off the roof even if you slip.
When you are three meters from the edge of the roof, stop working and stop. Let the freshly washed roof area dry. When the roof is dry, turn around and continue washing the roof so that you move with your face towards the edge of the roof, not with your back, so that you eventually fall
 to wash a car")